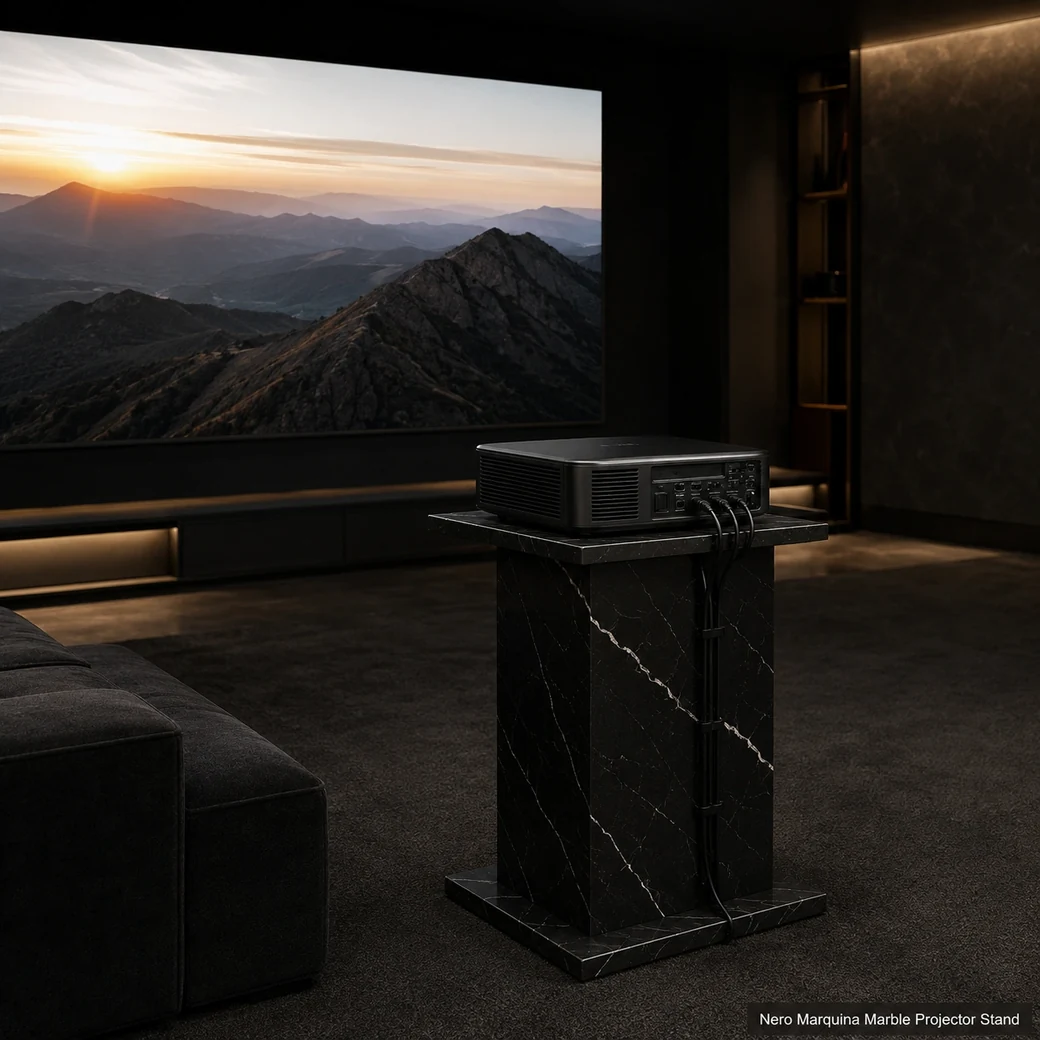
A projector stand should place the lens at the height and throw position required by the projector, while its platform must exceed the device’s weight and footprint. A wall shelf saves floor space; a tripod offers portability. Either option needs ventilation around the projector and organized cable routing. When mounting to a marble-clad wall, fix through to a suitable structural substrate using an engineered anchoring method.
Stable Home Projector Support
Marble Projector Stand Small
Secure product inquiry
Buy now
Cash on delivery available. Product details are pre-filled below. Owner delivery adds AED 5,000.
Ventilation, Height & Cable Routing
Platform Height, Ventilation and Wall Installation
Projector placement is governed by lens height, ventilation and cable access more than by decorative finish. Adjustable tripod stands commonly span roughly 23.5–63.5 inches, while wall shelves save floor space but must be rated for the projector weight and fixed appropriately to the wall substrate. Open clearance around cooling vents and a dedicated path for power and signal cables help prevent overheating and accidental cable strain.
Projection Setup
Choosing the Right Projector Stand for a Marble Wall
Set the projector support from the required lens height and throw position, not from the stone wall itself. A floor stand offers flexible positioning, a tripod is useful for temporary setups, and a properly engineered wall mount is preferable when the projector position is permanent and the room layout allows the lens to remain accurately aligned with the screen.
Support Formats
Stone Projector Shelf Configurations
Freestanding stone pedestals provide a stable fixed projection position and conceal cables neatly when the room layout is permanent. Adjustable tripods are far easier to reposition but are not truly stone-led furniture, while floating wall shelves save floor area and need structural anchoring plus enough ventilation and rear clearance for the projector.
Home Projector Platform Footprint and Load
The projector should fit fully within the 40 × 35 cm top with extra space for ventilation, lens positioning and cable exits rather than matching the device footprint exactly.
Projector Shelf Cooling Clearance
Keep the projector’s intake and exhaust zones unobstructed with open air around the 40 × 35 cm platform so heat can escape during extended projection.
Home Theater Stand Cable Management
Route power, HDMI and router cables through planned rear channels or wall penetrations so connections stay accessible without crossing the projector platform.
Product Data
Velvet Black Projector Pedestal Details
This small projector pedestal uses Nero Marquina compact black limestone with velvet-black colouring, fine ivory veining and a Brosso Vecchio finish. Its 40 × 35 × 70 cm format weighs 38.5 kg, creating a substantial equipment platform whose projector footprint and ventilation clearance should be checked before use.
| Platform Tilt Adjustment | ±15° platform pitch adjustment |
|---|---|
| Levelling Range | ±10 mm threaded-foot levelling range |
| Lens Centerline Offset | Adjustable lens centreline offset from 0 to ±100 mm relative to platform centre |
| Cable Grommet Diameter | Ø60 mm rear cable grommet with removable brush insert |
| Power Adapter Shelf | 250 × 150 mm ventilated lower shelf for the projector power adapter |
| Anti-Slip Device Pad | 3 mm-thick heat-resistant silicone device pad with ventilation perforations |
| Equipment Retaining Lip | 20 mm-high front and side equipment-retaining lip with rounded corners |
| Remote Control Slot | 120 × 45 × 20 mm felt-lined slot for the projector remote control |
| Adjustable Foot Range | Four M8 threaded feet providing 0–12 mm levelling adjustment |
| Vibration Pad Material | 5 mm-thick high-density neoprene vibration-isolation pad, Shore A 45 |
Made to Order
Custom Projector Shelf Options
A custom projector shelf should match the equipment footprint, lens centreline and required installation height. Cable openings, ventilation space and structural anchoring can be positioned from the projector specification so neither airflow nor image alignment is compromised.
Key Benefits
Why Choose This Home Cinema Projector Stand
This home cinema projector stand can be fabricated around the projector’s exact footprint, weight, lens position and cable requirements so the equipment sits where the room layout actually needs it. A stable stone platform provides substantial support, while ventilation clearance and routing for power or signal cables can be integrated into a bespoke cinema setup.
- Stable Device Platform
The substantial Nero Marquina platform provides stable projector support when sized to exceed the device footprint and operating weight.
- 38.5 kg Stability
The 38.5 kg Nero Marquina structure creates a substantial platform that stays firmly positioned beneath compatible projector equipment.
- Ventilation Ready Design
Open clearance around the projector allows cooling airflow to remain unobstructed while the device stays securely supported at the required viewing height.
- Custom Lens Height
Platform height can be fabricated around the projector’s required lens position and throw geometry so the image aligns correctly with the screen.
Purchase Guidance
Before Ordering a Stone Projector Pedestal
Before ordering a Nero Marquina projector pedestal, provide the projector's weight and footprint so the top platform fully supports the unit with safe operating clearance. Confirm the required lens height and throw geometry, leave adequate ventilation around intake and exhaust areas, and plan a cable route that reaches power and signal connections without crossing the airflow path; exact dimensional planning is also central to products such as vanity tops canada.

Specification Reference
Nero Marquina Projector Stand Technical Specifications
The technical table should confirm the 40 × 35 cm platform, 70 cm height and 38.5 kg weight together with supported projector load, ventilation clearance and cable-routing access so you can match the pedestal to the projector footprint, lens position and airflow requirements.
Product details
Specifications, care, delivery and FAQ
Everything is rendered from product JSON fields so the page remains SEO-ready even before JavaScript runs.
Cleaning: Power down and remove the projector before cleaning, dust Brosso Vecchio Nero Marquina with microfiber, wipe using a barely damp pH-neutral cleaner cloth, clear ventilation and cable openings with a soft brush, dry fully before reconnecting equipment, avoid acids abrasives and spraying near power or HDMI connections
Daily Care: Dust the Brosso Vecchio platform daily, keep projector ventilation and cable routes unobstructed, wipe stone with a dry or barely damp neutral-cleaner cloth, inspect stability and fixings regularly, avoid liquid near electronics and exceeding the platform load
- Avoid blocking projector ventilation
- avoid sharply bending power or HDMI cables
- avoid exceeding the platform load rating
- avoid liquid near electrical connections
- avoid fixing through marble cladding without structural anchoring
Maintenance: Remove and unplug the projector first, dust cable openings and ventilation areas, wipe Nero Marquina with a barely damp pH-neutral cleaner cloth, dry fully before reconnecting, inspect platform level and fasteners, keep cables strain-free
Handling: Power down and remove the projector and cables, use two people for the 38.5 kg stand, lift from the base or structural frame, pad Nero Marquina corners, keep cable openings unobstructed, re-level the platform before equipment setup
How much larger should a projector stand platform be than the projector footprint to provide safe edge clearance, ventilation and access to cables?
The platform should extend approximately 30–50 mm beyond the projector on each side while leaving all intake and exhaust vents completely unobstructed. Provide extra rear clearance for power and signal connectors, use a raised lip or restraint that does not block ventilation and ensure the stand’s rated load comfortably exceeds the projector’s weight.
What stand height is required to align the projector lens with the screen while maintaining the correct throw distance and avoiding excessive digital keystone correction?
Calculate stand height from the projector lens position, screen mounting height and the unit’s permitted vertical offset. The lens should align with the screen according to the projector’s lens-shift specification, while throw distance is measured from lens to screen; physical alignment is preferable to digital keystone correction, which reduces usable image quality.
How much unobstructed clearance should remain around the projector’s intake and exhaust vents so the platform, wall or nearby equipment does not cause overheating?
Maintain the projector manufacturer’s stated clearance, typically at least 10–20 cm around intake and exhaust vents, with more space on the hot-air discharge side. The platform must not block underside vents, and warm exhaust should not blow directly against a wall, cable bundle or enclosed shelf.
Where should power and HDMI cable openings be located so connector heads pass through easily without obstructing projector ventilation or creating sharp bends?
Position sleeved cable openings at the rear side nearest the projector’s connection panel, outside all intake and exhaust zones. Each opening should accommodate the largest HDMI or power-plug head—typically at least 35–50 mm depending on connectors—and include rounded edges, strain relief and enough rear space for the manufacturer’s minimum bend radius; avoid a single central hole that forces cables across vents.
What is the platform’s verified maximum load, and can it support a heavy home-cinema projector with sufficient safety margin when the device sits slightly off-centre?
The platform’s maximum load must be stated by the fabricator and should exceed the projector’s operating weight by at least 50%. A 15 kg projector therefore needs a stand rated for at least about 22.5 kg, including safe off-centre loading; its complete footprint must remain supported, with vents unobstructed and the centre of gravity well within the 40 × 35 cm platform.
Reviews
Reviews and new review submission
0.0 average rating from 0 reviews. New reviews are saved as pending until approved.
No approved reviews yet for this product. The review form is ready for buyer submissions.